
Introduction
This page explains how to set up a RainMage unit. In addition to the parts of the RainMage, you will need some small stones (preferably dry and reasonably clean) and a computer or mobile phone. You will also need to know the name and password for the nearest WiFi access point.
Assemble the outdoor unit
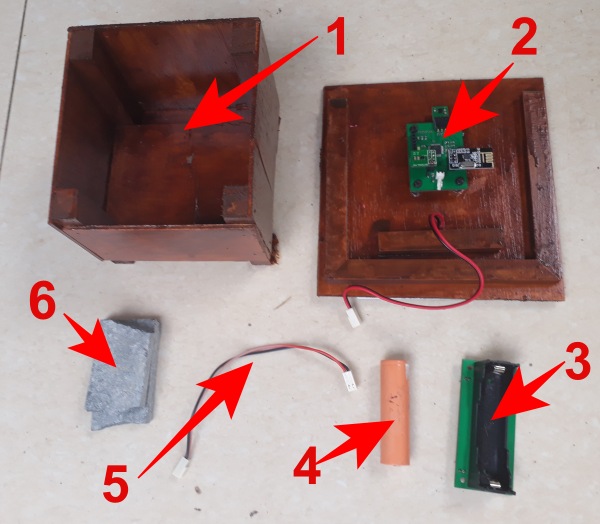
The outdoor unit is made up of six parts:
- the base
- the lid, with solar panel and sensor module attached
- the charger module
- the battery
- a cable with a 2-pin plug at each end
- some small stones
What are the stones for? The outdoor unit is very light, and might be knocked over by a strong gust of wind. Put the stones inside the base to make sure that it doesn't blow away. You have to provide your own stones.
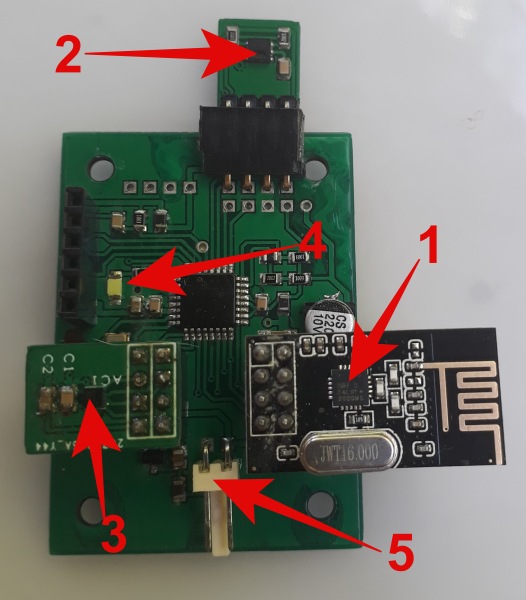
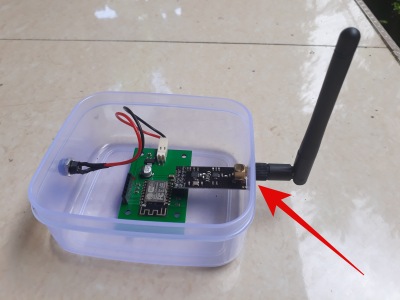
The sensor module has three other modules plugged into it: a radio (1), a temperature & humidity sensor (2) and a vibration sensor (3). It also has a white led (4) and a power connector (5).
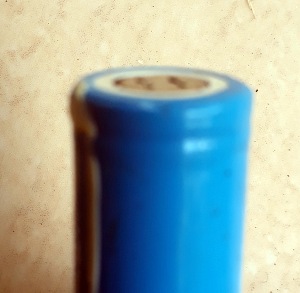
The battery holder has a + sign at the plus end. The battery has a metal nipple at the plus end, but it doesn't stick out as much as on normal batteries. There is also an indented ring round the outside of the plus end. Insert the battery into the holder with plus end of the battery at the plus end of the holder.
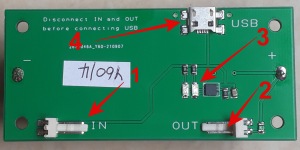
On the other side of the charger module, there are two LEDs (3). Once the solar panel is connected, the red LED comes on when the solar panel is exposed to sunlight, and the green LED comes on when the battery is charging. In normal use, you need to connect the input connector (1) to the solar panel, and the output connector (2) to the sensor module. If the battery goes flat, you can use the USB connector (4) to recharge it. Important! disconnect the other cables before connecting the USB cable.
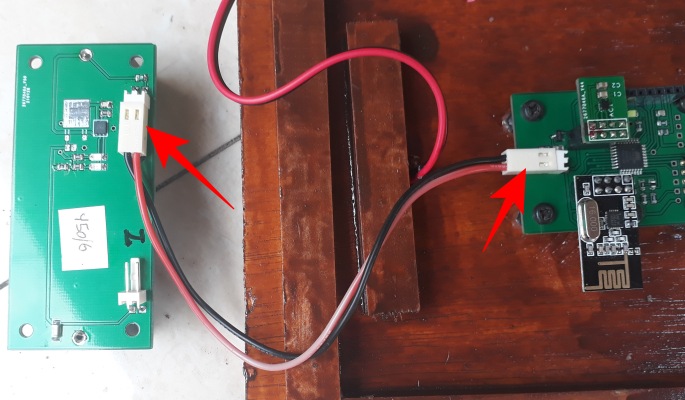
Use the cable with a plug at both ends (5) to connect the charger output connector (2) to the sensor module. The white LED should flash once a second for ten seconds. After that, it should flash once every five seconds.
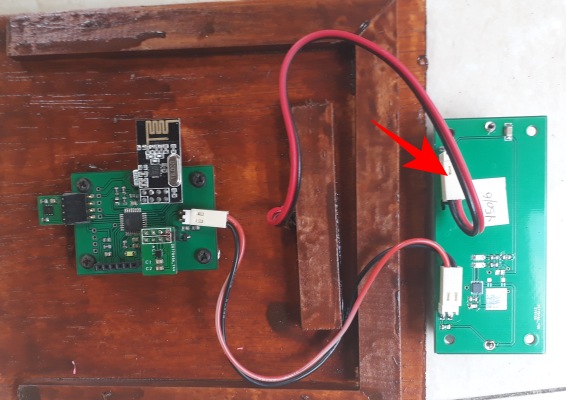
Connect the solar panel cable to the input connector (1) on the charger module. When you hold the solar panel up to a strong light, you should see the red LED (3) on the charger module come on.
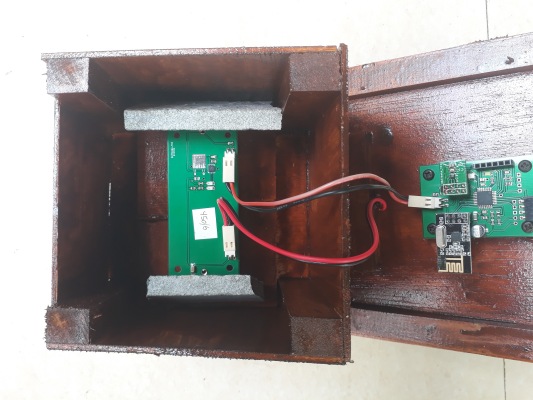
Carefully place the charger module inside the base, and then put small stones all round it, then put the lid on, with the solar panel at the top of the slope.
Assemble the indoor unit
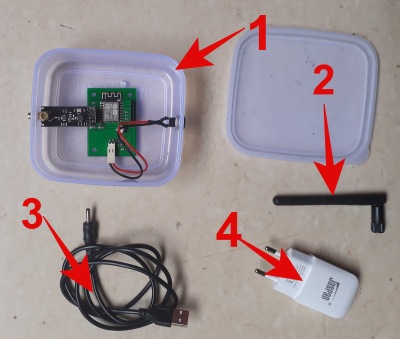
The indoor unit is made up of three parts: a box (1), an antenna (2), a power cable (3), and a power supply (4). The power supply and cable may already be connected together.
Open the box: this may make the next part easier. Screw the antenna onto the box then fold the antenna at right angles. Turn the antenna so that it points upwards. There is a separate swivel joint on the antenna, so you don't need to tighten/loosen the antenna screw to get it to the vertical position.

Plug the power cable into the box and then plug the power supply into a mains electric socket. A blue LED should start flashing- one second on, one second off. The unit is now ready to set up the wifi connection.
Enter WiFi details
- On your phone or computer, select the access point called rainmage
- Enter the password passfriend
- Open a browser and connect to 192.168.4.1 (on some phones, tapping the access point may give you a menu offering a link to this address). This will open the home page, which shows you details about the unit.
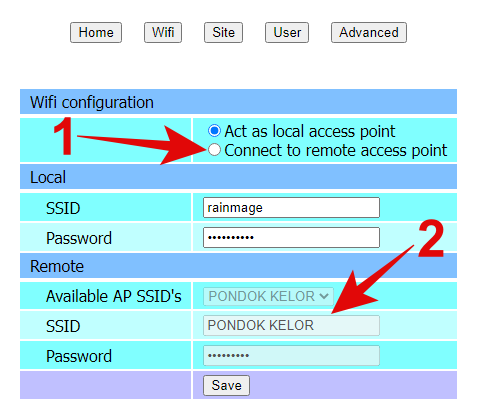
- Click on at the top right of the page: this will open the Wifi page. At the top of the page there are buttons for other settings pages: you don't need to use these yet.
- Click on the "Connect to remote access point" button. (1)
- Either select an access point name (SSID) from the list, or type in the access point name (2)
- Type in the password
- Click on . This will save the details and restart the Rainmage.
When the Rainmage unit restarts, the blue light will come on for 10-15 seconds, then it should start flashing once every five seconds. Shortly afterwards, your browser should connect automatically to the home page on your rainmage unit. If not, see the troubleshooting page.
The blue LED is very bright, especially at night. You can change the settings so that it does not flash at all, or only flashes during daylight hours: see see User Settings.
You can access details about showers at any Rainmage unit from wherever you are, using the RainMage web site www.rainmage.com.
Whenever you are close to your RainMage unit and you are able to connect to the same WiFi network, you can also access the server on the Rainmage unit directly: this provides more detailed information about current rainfall at your location, together with information to help you fix problems. You can also alter the settings of the unit to suit your preferences. For more information about this, see Local Server.
Choose a location
The outdoor unit measures rainfall, so it needs to be in a place where it is not sheltered from the rain by buildings or trees, and is unlikely to be splashed by runoff from roofs. The surface must be flat: if all of the legs are not on the surface, it may rock from side to side, causing errors. If your walls have flat tops, you can place it on top of a wall. It contains a solar panel, and needs to be somewhere that gets a reasonable amount of sunshine. If direct sunlight is limited at the best location, keep an eye on it throughout a day, and make sure that the solar panel is facing the sun when the sunlight is available.
The indoor unit is not waterproof and should be protected from rain. It needs to be fairly close to the outdoor unit, and ideally within line of sight. If you have power outside your building, placing the indoor unit outside but sheltered from rain would be perfect. The radio signal from the outdoor unit is only 5mW, compared to 100mW for Wifi. It can pass easily through wooden walls and windows, but metal insect screens or walls will reduce the signal strength. You may find that a small change in the position of one of the units (particularly the indoor unit) makes a big difference to the signal strength.
Once the unit is set up, you can check the quality of the connection between the indoor and outdoor units using the diagnostics page on your Rainmage unit.