
Introduction
This page explains how to identify problems with your Rainmage unit. You should already have installed the Rainmage unit: if not, follow the installation insructions.
You can easily check whether your Rainmage unit is working properly by checking the blue LED on the indoor unit. This only works if the LED is enabled: see User Details.
| State | Meaning | Solution |
| single short flash every five seconds | The unit is working normally. | - |
| two short flashes every five seconds | The indoor unit is not receiving data from the outdoor unit. | See current status |
| three short flashes every five seconds | The indoor unit has lost contact with your WiFi access point. | See Wifi problems |
| Flashing two seconds on, two seconds off | The Wifi details are incorrect or incomplete. | See Wifi problems |
| OFF | The unit is not working at all, or the LED has been disabled. | Check the power Check that the LED is enabled |
Current Status
If you can access the server on the Rainmage unit (see Making contact), go to the Current page.
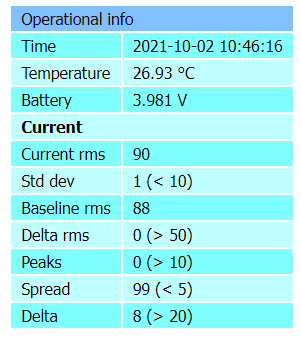
If there is a fault, there will be a line saying Fault in the Operational Info section, followed by one or more of these faults:
| Fault | Meaning | Solution |
| no data | The indoor unit is not receiving a signal from the outdoor unit | See No data |
| glitch | The outdoor unit is rocking- maybe due to wind | Check that it is on a flat surface, with all legs on the ground. If not, put a tile or a piece of wood underneath it. |
| low battery | The battery in the outdoor unit is getting low | See Battery |
| no server | The indoor unit is unable to talk to the main Rainmage server | See Wifi problems |
For any other fault, please contact us with details of the problem.
Wifi problems
If there is a WiFi or server problem, check that your access point has power, and then use the WiFi on your phone to check that you can reach the internet using the access point. If you can access the internet, try turning the RainMage indoor unit power off and on again.
If you have just installed the unit, maybe you incorrectly entered the WiFi access point name. If the unit was running correctly for a while, but you recently made changes to your access point, you may need to update the access point details.
When you apply power to the indoor unit, it tries for one minute to connect to the access point that you specified. The blue LED is on continuously during this time. After that, it sets up an access point of its own, but just for 30 seconds: the blue LED flashes on for two seconds, off for two seconds. While the blue LED is flashing like this, you can connect to the indoor unit. Once you are connected, the RainMage unit will stay in access point mode until you have finished making changes to the Wifi details: see the installation guide for instuctions.
No data
Remove the lid on the outdoor unit and check the white LED. This led is not very bright: you many need to move it somewhere shady in order to see it.
| State | Meaning | Solution |
| single short flash every five seconds | The unit is working normally. | - |
| two short flashes every five seconds | The outdoor unit is unable to send data to the indoor unit. | See Locating the outdoor unit |
| three short flashes every five seconds | The outdoor unit has an internal fault | Contact us. |
| off | The unit is not working at all | Try unplugging and replugging the power connector on the sensor module. If that doesn't work, the battery may be flat. See Battery |
Outdoor battery
The outdoor unit has a solar panel to charge its battery. If it doesn't get enough sunlight, the battery will slowly discharge. Keep an eye on the time of day when the unit is in direct sunlight, and make sure that the solar panel is facing the sun at that time. The best direction may vary with the seasons.
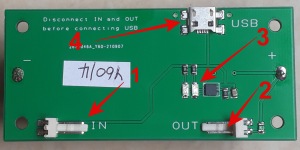
You can easily recharge the battery on the outdoor unit. On the charger module, disconnect the cables going to the solar panel (1) and the sensor module (2). Now plug a USB cable into the USB socket (4) and plug the other end into a USB charger. The red and green lights (3) will both come on. When the battery is full, the green light will go out. This could take up to 24 hours. Once it is recharged, disconnect the USB cable then reconnect the solar panel and sensor module cables: see Installation.
You can check the battery voltage any time using the Current page on the local server.