
Introduction
This page explains how to use the local functions on your RainMage unit. You should already have installed the Rainmage unit: if not, follow the installation instructions.
Making contact with the unit
You can access your Rainmage unit using a web browser on a phone or computer. There are two ways to do this:
- using a .local address
- using an IP address, for example 192.168.0.11.
Using a .local address
This method works on most computers and on iPhones. Open a browser and enter this URL: http://rainmage.local
Using an IP address
This method works on any device.
- Open a browser and go to www.rainmage.com/php/status.php
- You should see your site name in the list, with an IP address next to it
- Click on the IP address to connect to the rainmage unit
Once you know the IP address, you can access the Rainmage unit directly using this address. Note that the IP address may change if the access point loses power or is reset.
Pages
The rainmage server has abouta dozen pages of information. They are divided into three groups: the Home pages, the Settings pages and the Advanced pages. All of the pages in each group have buttons to go to other pages in the same group.
Home pages
When you first connect to your Rainmage unit, you will see the Home page. On each of the home pages, there are buttons along the top to access the pages that you might want to use on a day to day basis.

- Home - This gives you basic information about the hardware and software of your unit.
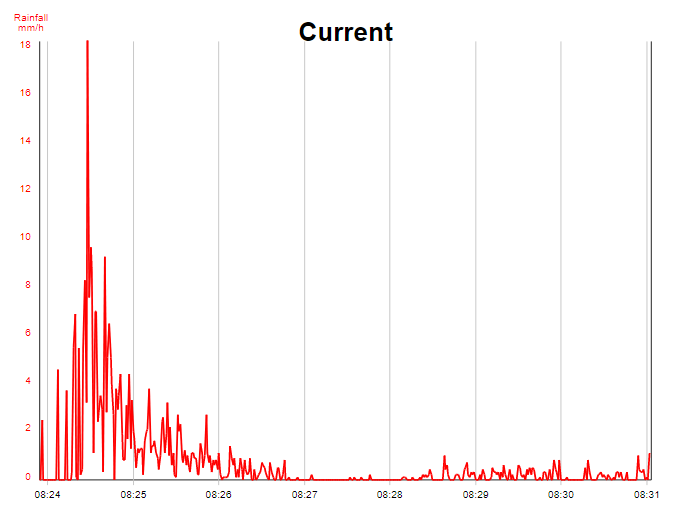
- Current - shows you detailed information about the current situation: rainfall, temperature, battery voltage, etc.
- Graph - if it is raining, this page shows you a graph of the current shower.
- Showers - this page shows you a list of the most recent twenty showers. Click on a shower to see a graph of it.
- Settings - this leads on the the settings pages
Home page
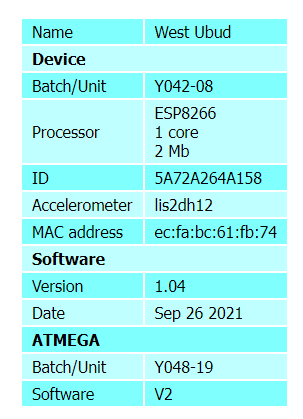
This page gives you information about the unit. You probably won't need to refer to it unless we ask for information from it to solve a technical problem with the unit.
Current Information page
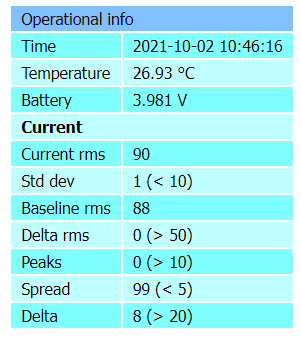
The first section tells you the unit's time and date (which should be correct). After that are the temperature and battery voltage of the outdoor unit. The temperature is measured inside the box, so when it's sunny, it can get quite high. On some units, it will also display the humidity. The voltage should generally be about 4V. If it drops below about 3.7V, it means that the battery is not charging properly: see troubleshooting.
The current RMS is a measure of the amount of vibration that the outdoor unit can feel. Generally it is about 70-90. When it rains, the number could go up to 1,000 or more. The other figures are used to determine whether or not it is raining.

Below the text information, there is a bar graph to show the RMS for the past minute. It should be reasonably flat if there is no rain.
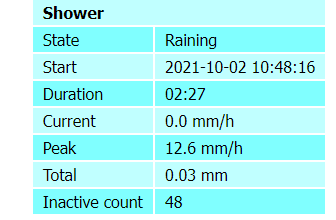
Once the unit decides that it is raining, it will display additional information: the start time, total rainfall in mm, and the current and peak rainfall in mm/h.
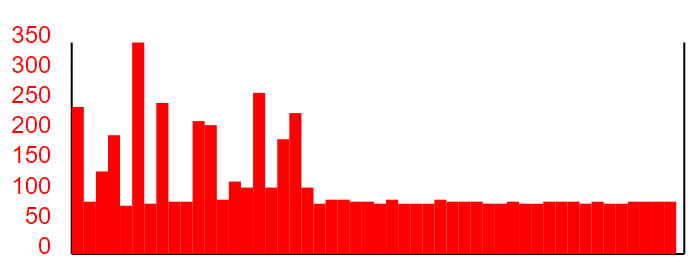
While it is raining, the RMS bar graph will look like this.
Graph page
If it is raining or has been raining recently, The graph page shows you a graph of the current or most recent shower.
Shower list page
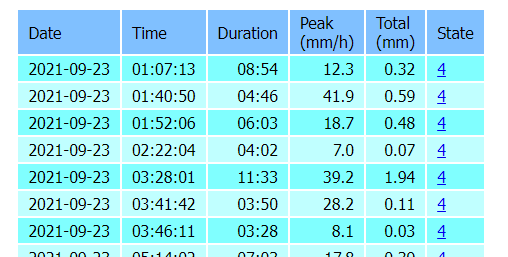
This page shows you a list of the most recent twenty showers. Click on a row to see the graph for that shower.
Settings pages

If you press the button on one of the home pages, you will go to one of the settings pages, depending on what settings information you have already entered. On each of the settings pages, there are buttons to access each of the other settings pages.
Wifi details
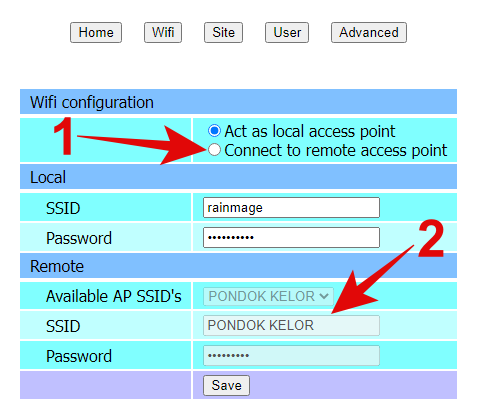
This page contains information about the wifi connection to the rainmage indoor unit. You should have set this up during the installation process. You will only need to use this again if you want to change the access point name or password.
Site details
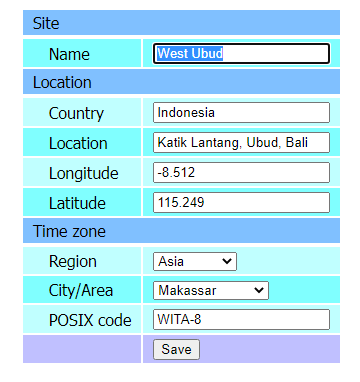
We usually set up the site details before sending out a unit. If this has not yet been done, or if you want the change the details, this section explains how to do it. From the home page, press the button at the top right of the page. If WiFi is already set up, it should open the Site Details page. If not, press the button.
- Enter a name for the site. This should give people a rough idea where the rainmage unit is located
- Enter the name of the country.
- Enter the location- a slightly more detailed description
- Enter the GPS co-ordinates. You can find this on Google Maps by touching somewhere nearby that does not have any text. For Bali, the longitude should be -8.xxxxxx and the latitude 115.xxxxxx.
- Select the time zone region and city. For Bali, this should be Asia and Makassar. The POSIX code will then be filled in automatically.
- Click on the button.
User details
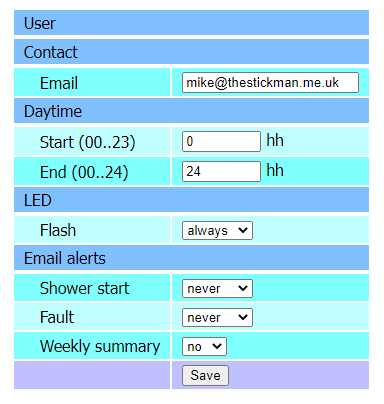
This section can be used to specify your preferences. From the home page, press the button at the top right of the page, then press the button on the settings bar.
- Email address. We will use this to contact you if there is a problem with the unit, and to send you reports of rainfall recorded by your unit.
- Daylight hours: you can specify whether other things are done Never, During daylight hours or always. For 8am to 8pm, enter 8 and 20.
- Flash: The blue LED on the unit is quite bright. It's useful to have it flashing during the day, so that you can quickly check that it is working, but it could be very annoying at night. You can tell the unit to flash Always, During daylight hours only, or Never.
- Shower start: The unit can send you an email when a shower starts: this is useful if you have clothes drying outside. The options are Always, Daylight and Never.
- Fault: The unit can send you an email when there is a problem with your Rainmage unit. The options are Always, Daylight and Never.
- Weekly summary: The unit can send you an email with a summary of rainfall during the previous week. The options are Yes and No.
- Click on the button.
Advanced pages

If you press the button on one of the home pages, you will go to one of the advanced pages. On each of the advanced pages, there are five buttons. The button is probably the only one that you will need to use.
Diagnostics
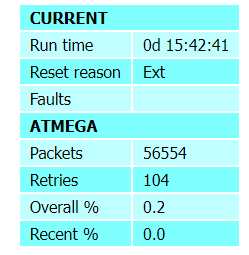
The diagnostics page is one of the advanced pages. It shows details of the connection between the indoor unit and the outdoor unit, and provides a full list of errors that have occurred since it was last reset.
Inte upper section (CURRENT), you will see the time that the unit has been running since the last reset, the reset reason, and any active faults.
In the middle section (ATMEGA), you will see the number of packets of data sent from the outdoor unit to the indoor unit, and the number of times the outdoor unit had to retry sending. The smaller the number of retries, the better the connection. The outdoor unit will retry up to 15 times for each data packet, but ideally most packets should not require a retry. Below the number of retries is the overall percentage of retries, then a percentage over the past thirty seconds.
If you want to experiment with different indoor and outdoor unit locations, you can use the recent percentage to give a quick indication of the signal quality. Once you have chosen a new location, press the button to clear the packet and retry counts.If you check again in an hour or so, the overall figure will give a better long-term average.